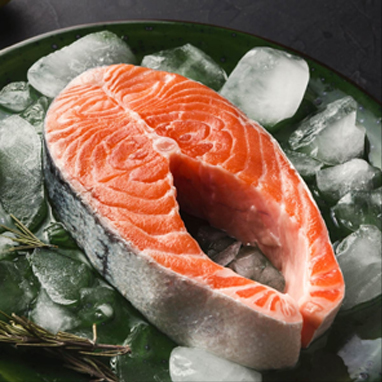
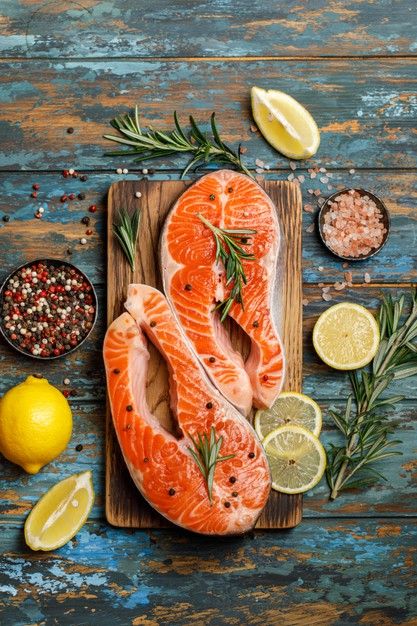
Salmon Steak
Realtime Material and Shader in UE4
Project Overview
I created both raw and cooked versions of organic materials. Through this project, I was able to refine my skills in organic material design and real-time rendering with industry-standard software. It also challenged me to approach the project creatively and think critically about how to achieve the most realistic and engaging results
Role: Concept, Model, Material, Texture, Shade, Lighting, and Rendering
Introduction
As someone who has always been interested in food, I decided to combine this passion with my skills in CGI by undertaking a project that explored the intersection of these two fields. Specifically, I wanted to study subsurface scattering, a technique used to create realistic-looking food textures, by researching steak recipes and taking photos of them myself.
To create the desired mood and tone for the project, I conducted extensive research online, looking at different sources for inspiration and guidance. I analyzed the lighting, colors, and overall aesthetic of various food photography, and used this knowledge to inform my approach to the project.
Through this project, I was able to not only deepen my understanding of subsurface scattering, but also to explore my interest in food and food photography in a new and exciting way. The combination of technical skill and creative expression required for this project was challenging, but ultimately rewarding, and I look forward to continuing to push the boundaries of what is possible at this intersection of CGI and food.
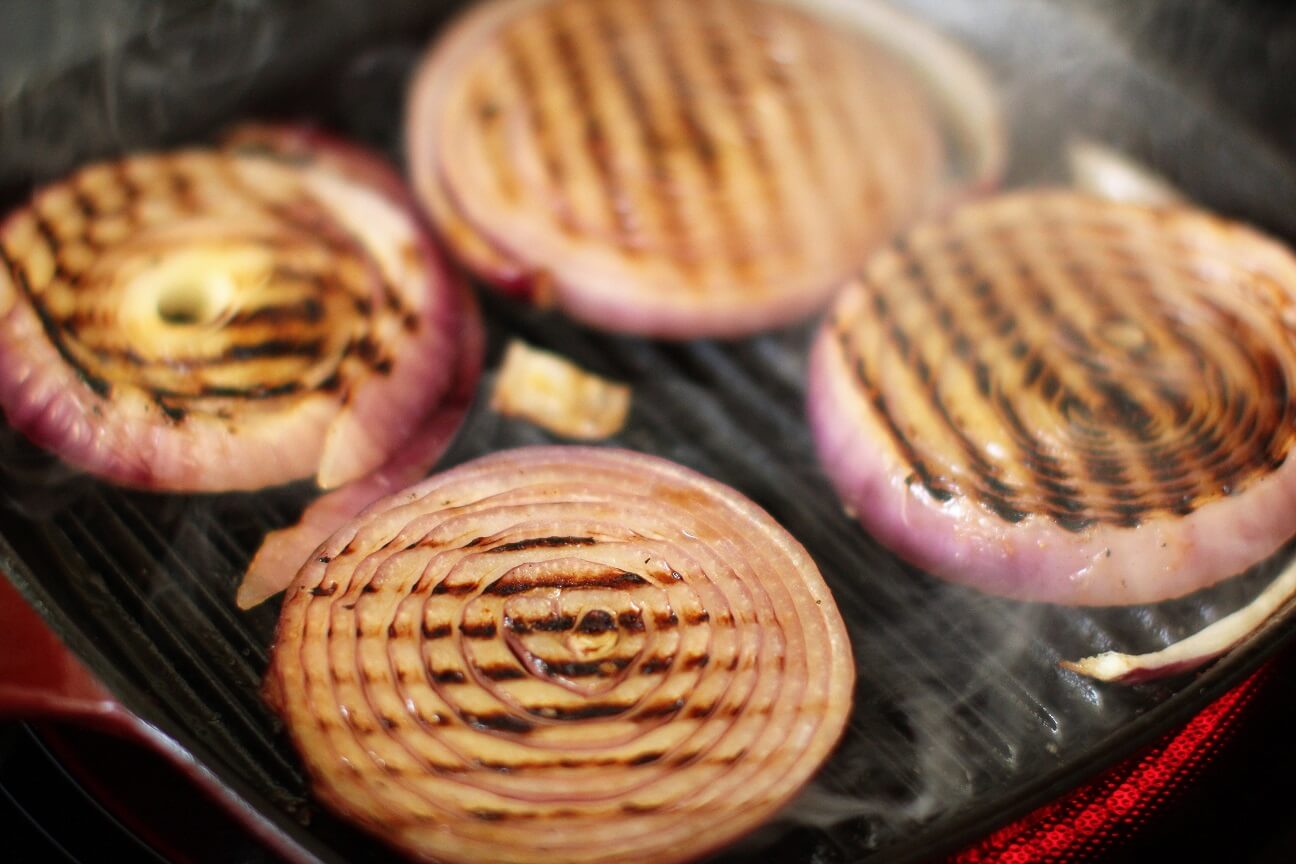
Inspiration & Reference
As someone who has always been interested in food, I decided to combine this passion with my skills in CGI by undertaking a project that explored the intersection of these two fields. Specifically, I wanted to study subsurface scattering, a technique used to create realistic-looking food textures, by researching steak recipes and taking photos of them myself.
To create the desired mood and tone for the project, I conducted extensive research online, looking at different sources for inspiration and guidance. I analyzed the lighting, colors, and overall aesthetic of various food photography, and used this knowledge to inform my approach to the project.
Through this project, I was able to not only deepen my understanding of subsurface scattering, but also to explore my interest in food and food photography in a new and exciting way. The combination of technical skill and creative expression required for this project was challenging, but ultimately rewarding, and I look forward to continuing to push the boundaries of what is possible at this intersection of CGI and food.
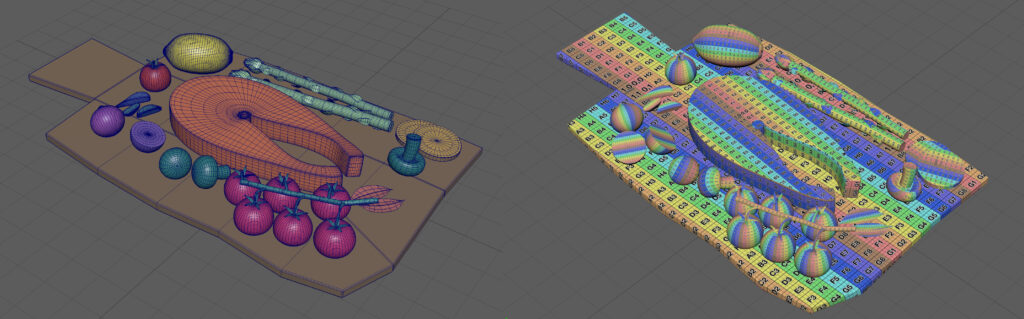
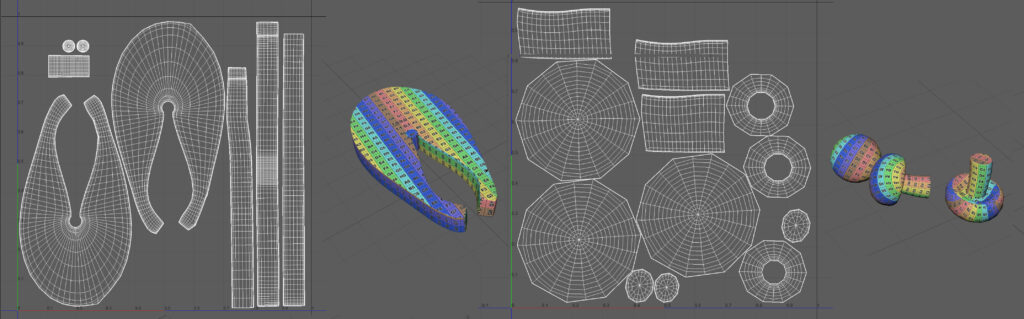
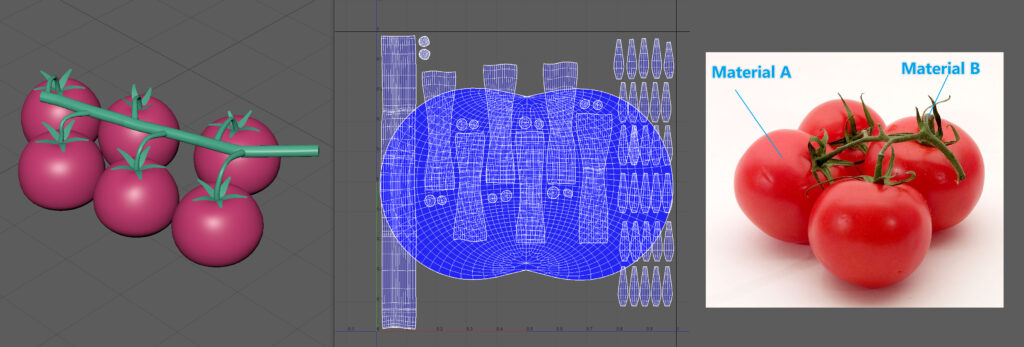
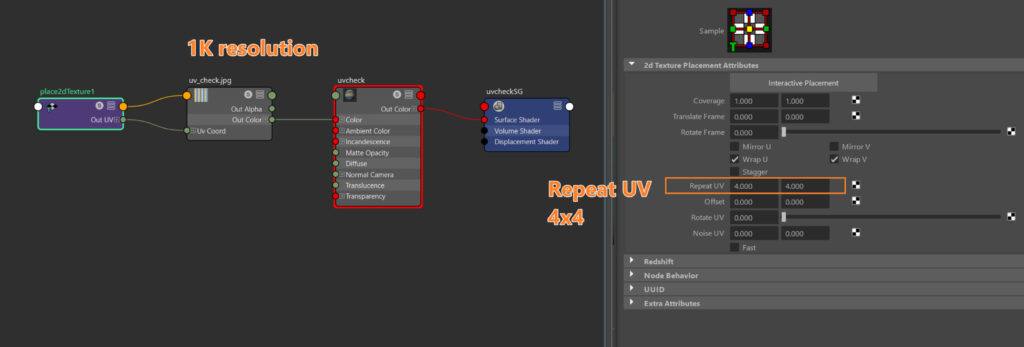
Model and UV Mapping
Using Autodesk Maya, I created a 3D model using basic shapes like spheres, cylinders, ovals, and cubes. Starting with low polygon shapes, I added bevels to the corners and increased the number of divisions to create a detailed and realistic model.
To ensure that my textures were as high-quality as possible, I needed to create a close-up rendering of my project. Unfortunately, Unreal Engine version 4.27 did not support multiple UV Mapping, so I had to find another solution. To do this, I used a UV checker in 4K resolution and adjusted the repeat UV attribute in the place2dTexture node in Maya hypershade. By increasing the resolution from 1024×1024 to 4096×4096, I was able to test how close I could make the most detailed aspects of my project.
This approach allowed me to test the texture resolution in a controlled and precise way, ensuring that my final rendering would be as realistic and detailed as possible. While it required some additional effort and experimentation, I believe that the results were well worth it, giving my project a level of texture and detail that truly brings it to life.
For the tomato model, I combined green and red parts to become one object but separate materials.
When I separate material in Maya, UE will follow the material element the same as in Maya. So, this is a good way to make an object has more details.
Texture and Material
I begin my material work in Substance Designer, where I create a strip and use several nodes such as the Cartesian to Polar node, Warp node, and Creased node to create the salmon material. you can see all detail in this breakdown document.
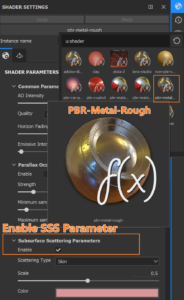
Substance Painter is a powerful tool for creating textures in 3D. With the ability to see all around the object, painting textures in 3D is often easier than in 2D. In this chapter, I will guide you through the process of creating a salmon texture. Choosing the right material type is essential, and by making a small adjustment to the default settings, we can achieve a great result. I use PBR-Metal-Rough for the material type then enable SSS and choose “Skin”
Unreal Engine material real-time rendering is different from CPU or GPU-based traditional rendering. I start with creating basic material in a content browser
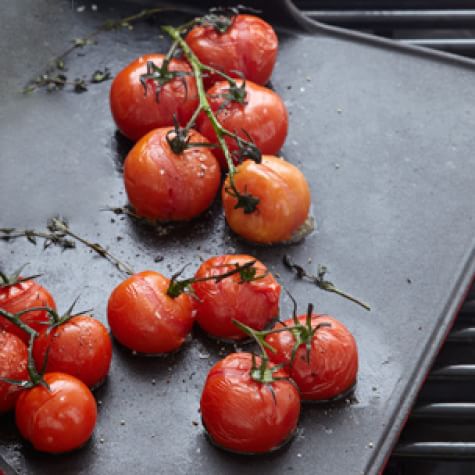
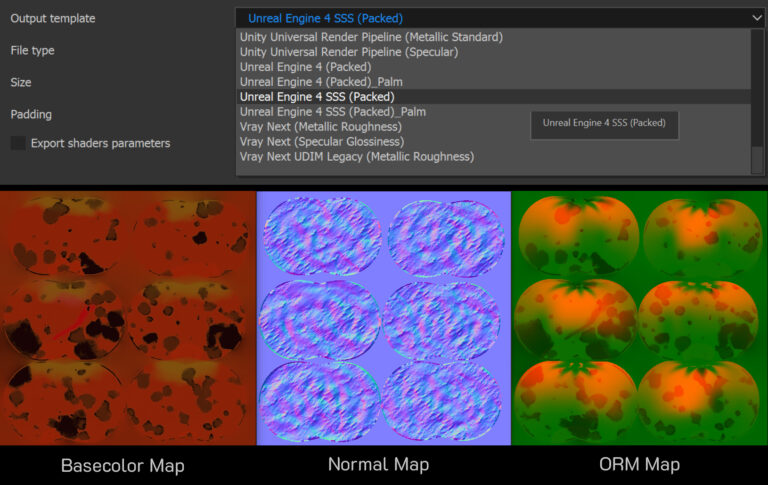
The last couple of image is tomato texture breakdown in Substance Painter. the first image is a raw texture version and the second image is a cooked texture version

Unreal Engine: Shader
In this part, I will explain more about shaders and material connections in Unreal Engine. Because subsurface scattering is a complex effect that is related to material and light, I use both subsurface scattering systems: sss and sss profile.
I separate both raw and cooked version
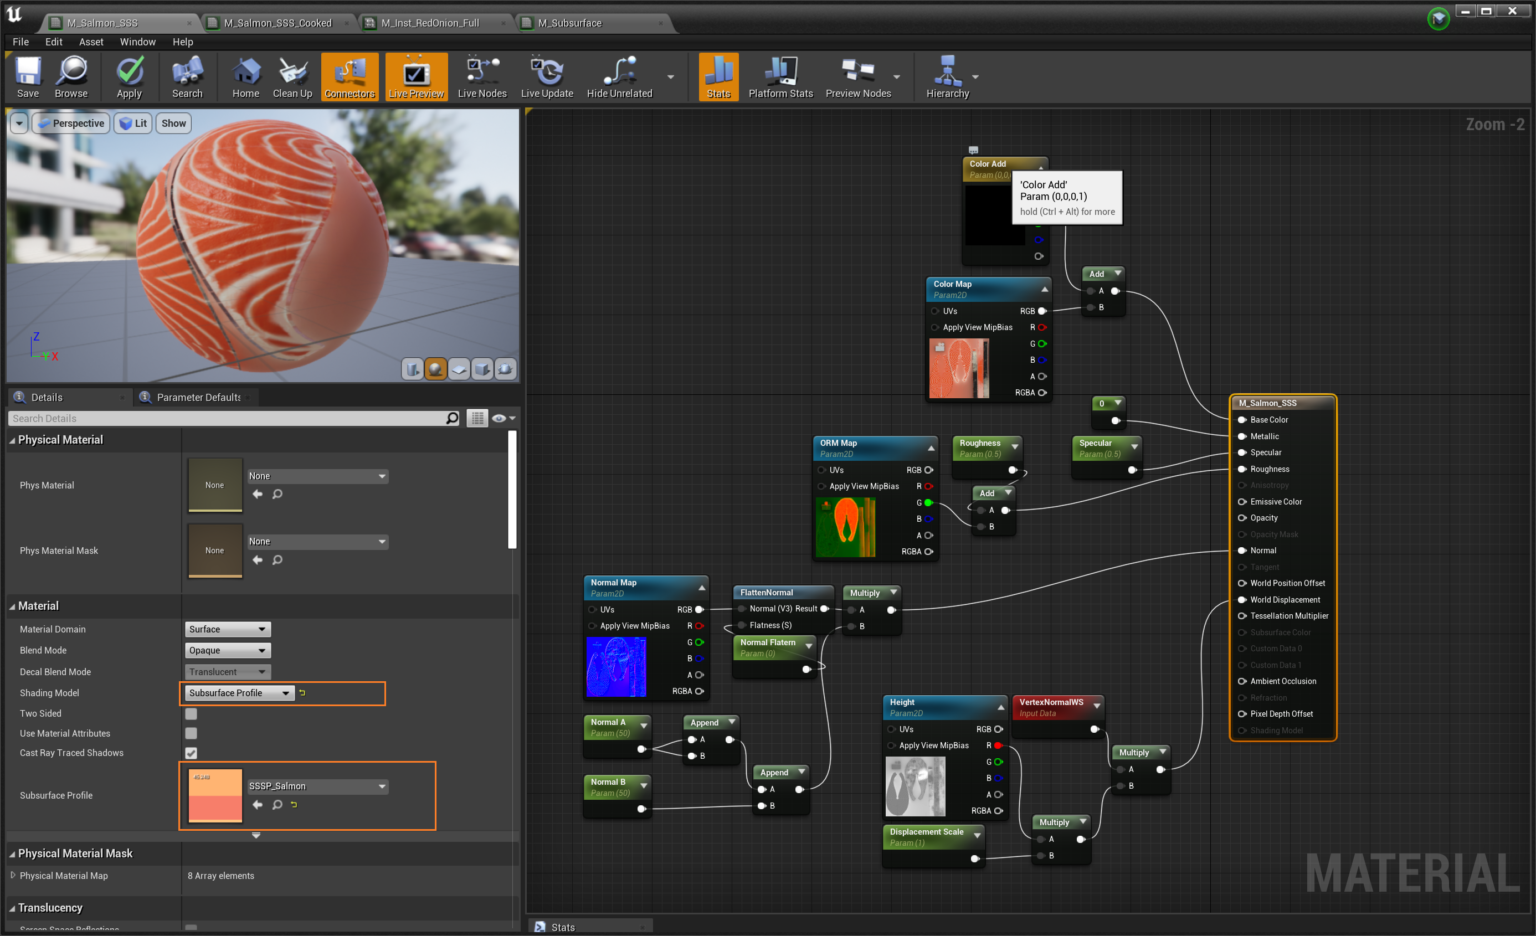
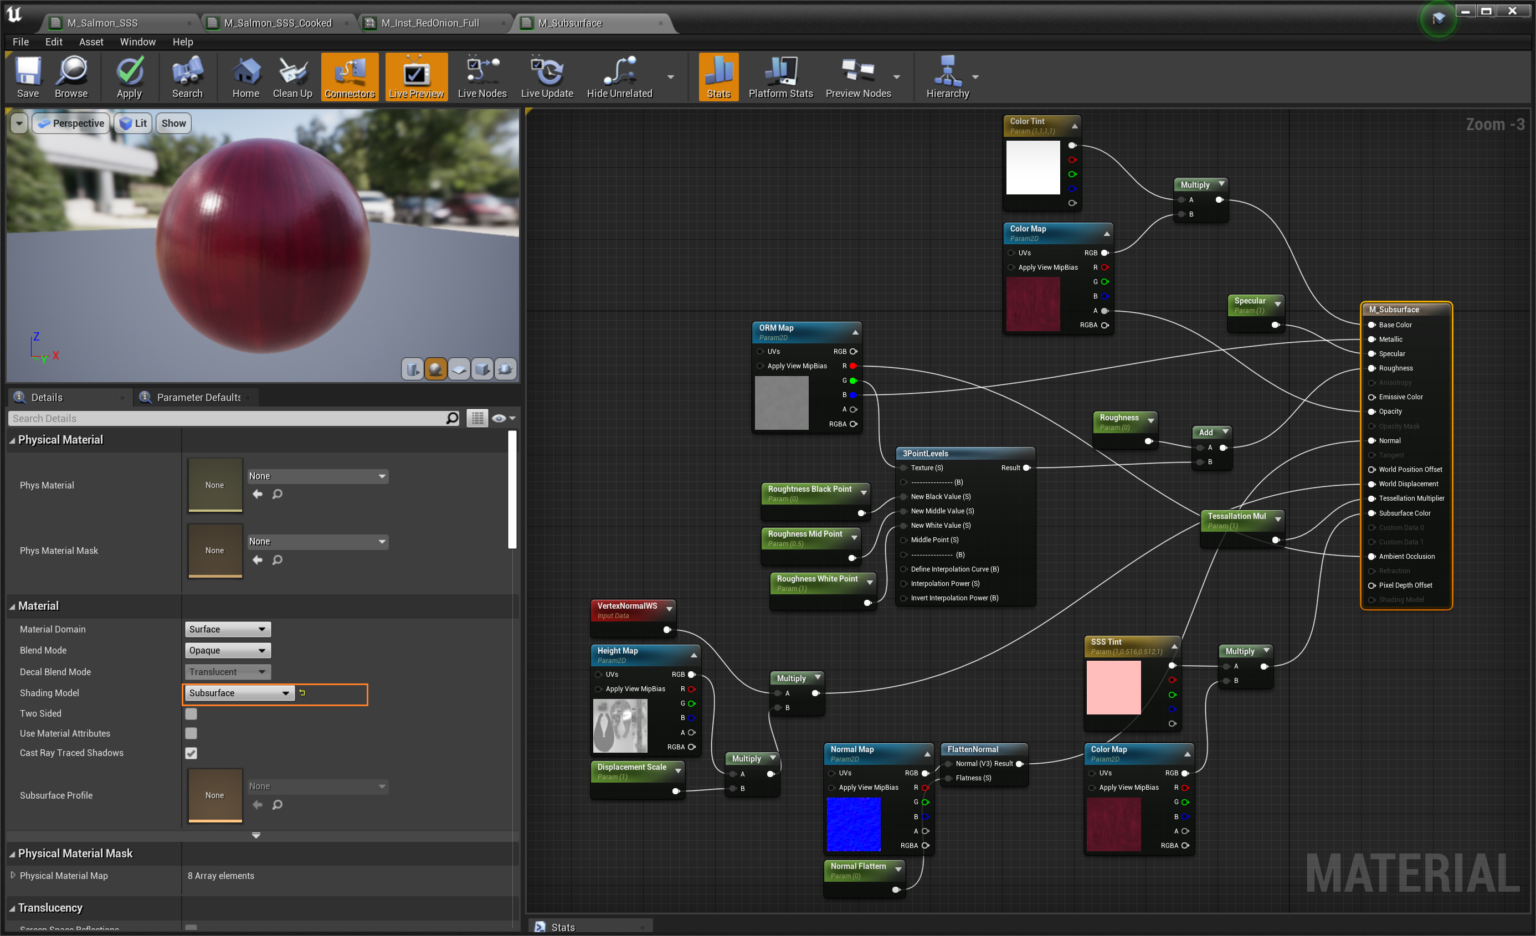
Basic Material Connection
There are two images of the SSS and SSS Profile material connection
1. Connect the input of the base color with a 3-vector color before multiplying with Base Color Map.
2. Connect ORM (Ambient Occlusion, Roughness, Metalness) separately
– R channel, connect with ambient occlusion input
| – G channel, connect with roughness input
– B channel, connect with metalness input
3. Before connecting the roughness map, I create 3 PointLevel for adjusting the image.
4. Create a VectorNormalWS and multiply it with the Height Map before connecting to the World Displacement.
5. Connect Normal Map with FlatternNormal Map and then connect with material node
6. Create vector 3 color node and multiply SSS
Previsualization
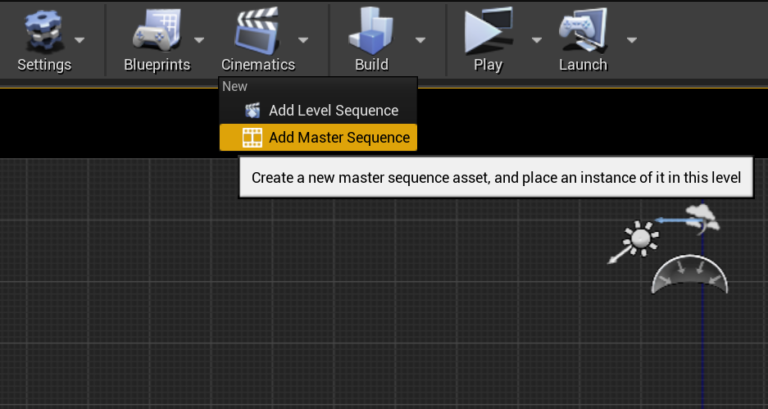
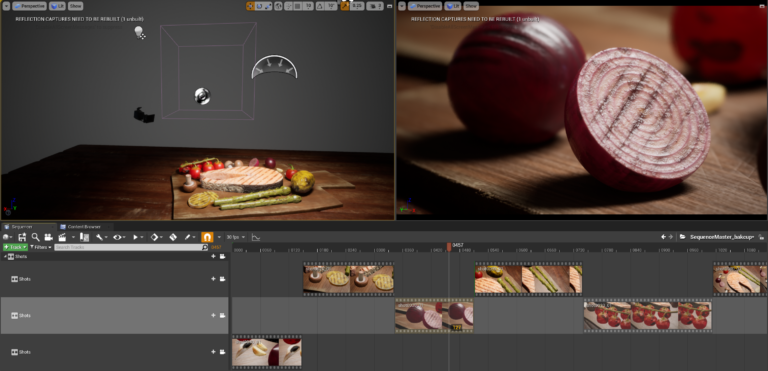
In this part, I use the master sequence instead of the level sequence. The master sequence is contained many “level sequence” and is easy to animate objects, camera attributes, or any attributes. The master sequence is easy for editing, I create 6 shots and move the camera each by each. Click here to see more detail about the master sequence.
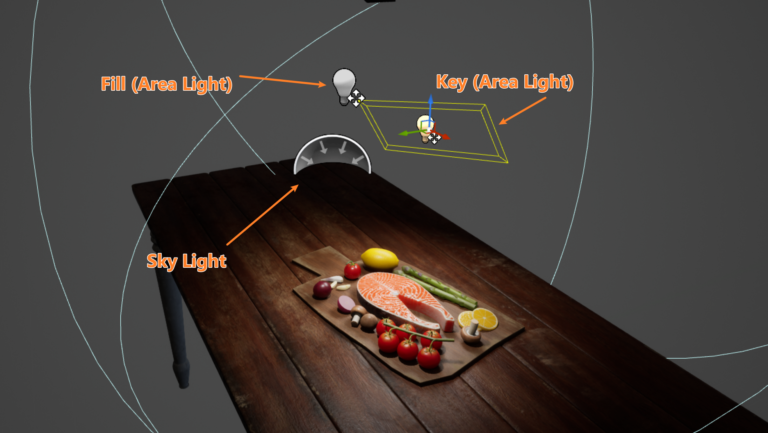
Lighting and Rendering
Inspired by the elegant world of fine dining food photography, I incorporated the subtle beauty of soft, low-key lighting in my work, using a carefully selected combination of 1 skylight and 2 medium-sized area lights to create a truly captivating atmosphere.
I use raytracing because I need to study more about real-time rendering. Ray tracing in UE4.27 offers several benefits over traditional rasterization techniques, including more accurate and realistic lighting and shadows, as well as better reflections and refractions. By tracing the path of individual rays of light, UE4.27 can simulate the way that light interacts with objects in the scene, resulting in more natural and realistic lighting effects.
Activate Ray Tracing and Post Processing to enhance image quality with accuracy and bloom attributes, creating a soft light and glowing effect. To ensure the highest quality output, utilize the Movie Render Queue feature found under Edit > Plugins. The Movie Render Queue facilitates precise control over rendering settings such as format and quality. For more detailed information about the Movie Render Queue, please click here.
Real-Time Shading and material in Unreal Engine are really new for me. It’s out of my comfort zone. I created a bunch of works with traditional rendering in both CPU and GPU-based rendering. however, real-time stuff is a new trend recently. In my opinion, it would be a great opportunity if I know this process. I can expand my existing skills and study in-depth. When I was working on the shader, I was very impressed with the pace. When I enable the ray tracing, the shadow is softer and the sample quality is much better than before. I will study more in lighting and material in Unreal Engine and will use it in my MA Project.
In addition, I have edited the transition and juicy look for the sliced lemon from the professor and professional artist’s advice. I think Unreal Engine can solve problems and go back and forth very easily. so, this is the before and after image.
Finally, Thank you, Professor Manuel Prada, Ariyawat Meechoui, and Gen Li for helping and giving me useful suggestions. I hope this article will help you guys who have a passion for building visual imagery, lighting, and rendering can find a solution. if you need more information please contact me at palmpiraban@gmail.com